Lapping the Dovetails
Introduction
Lapping is a method of smoothing an item by working it back and forth over an abrasive medium such as carborundum grit. The technique is used for grinding telescope mirrors, smoothing automotive engine valve faces and can be used to smooth metal parts to just about any desired level of surface finish.
Lapping the dovetail slides on the mini-lathe cross-slide and compound will give you a much smoother operating machine. Mike Taglieri posted the following procedure for doing this:
Over the past week or so, I’ve been lapping the various ways on my 7×10 to increase the contact area and minimize play. This has improved the lathe tremendously. For example, before this modification, the compound had significant slop unless I kept the gib screws so tight that it was hard to move.
Now, it slides easier than before, but it has zero slop both side-to-side and up-and-down, as measured on a test indicator. The process is tedious, but not hard. Here’s how I did it:
The Compound
This is the easiest one to start with because it’s small and you can adjust the gib by setscrews. I lapped it (and everything else) with Mothers Mag & Aluminum Polish. This is a metal polish (recommended for all metals, not just aluminum) that’s inexpensive and readily available.
Simichrome is similar but more expensive. These polishes are much finer than valve-grinding compound and other coarse abrasives. (And even if it turns out that the job would have gone faster with coarser abrasives, it would also be easier to screw up the lathe ways with one if you did something wrong).
To lap the compound, take off the compound leadscrew so you can move the compound slide back and forth on its base by hand. Remove the locknuts and make sure all the gib screws can tighten enough to move the gib. (One of my screws was distorted on the end and couldn’t move the gib, so I had to file the end).
Loosen the gib screws enough so the slide goes on easily, and use some heavy grease to hold the gib in place in the dovetail. (You’ll be taking the slide off over and over, so this will keep the gib from falling off each time).
Now, put gobs of polish on the bottom of the slide and the dovetails, and reinstall the slide, then tighten the gib screws until there is slight resistance and start sliding the compound back and forth. I slid mine each way enough to show the socket head screws underneath. As the high spots wear down, you will have to keep tightening the gib screws.

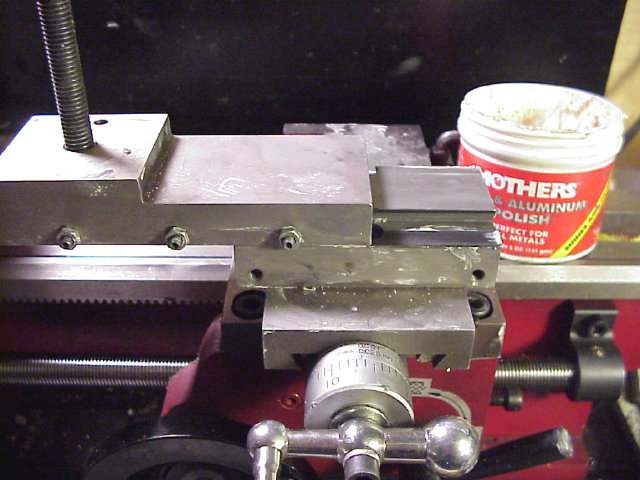
After several dozen strokes, take the compound off and look at the surfaces. As the first photo shows, the areas where the polish is grinding will be almost black, but the center of the dovetail on the base should not be black because the slide does not touch here (also, the underside of the gib shouldn’t be black because it should not be low enough to touch the base).
Wipe the polish off, put on new polish, and do it all again. I used toilet paper, then a soft cloth, for wiping, which is convenient because you can get most of the polish off on the toilet paper and throw it away each time).
When you examine the surfaces you’re working on, you’ll see shiny places (and probably not many at first). These are the only places where there is contact, and the goal is to grind until there are shiny places all over the sliding surfaces.
You want a fair amount of the surface in contact, but not total contact, since the pockets where the surfaces don’t touch act as reservoirs for oil. You keep repeating this process — renew polish, grind, wipe and inspect — until you’re satisfied with the results.
After awhile, it gets hard to tighten the gib screws without locking the slide completely, because more and more of the sliding area is coming into contact. (At that point I found it helped to tighten just one gib screw at a time, grind until that area slid easily, then tighten the next gib screw, etc. This let me grind pretty hard without locking up the slide (or wearing myself out).
As you continue, you may see small areas that are much shinier than the rest (especially on the underside of the slide). These are areas that were originally way too tighter than the rest because they were distorted during manufacture.
You can remove metal from these places with a scraper, the end of a file, or a bit of sandpaper on a the end of a stick so the rest of the surface can catch up. (If you do it with sandpaper, clean the surface thoroughly before doing any more lapping, because you may have added bits of a much coarser abrasive).
Every once in awhile, wipe the polish off totally, wipe a few more times with oil-covered toilet paper to get any remaining polish, then assemble and lube. This is so you can check how well the slide works with the degree of lapping you’ve done. Eventually, you should get easy sliding with no play until the slide is moved way out.
When the slide is lapped as far as you want, disassemble and clean the polish everywhere, (including pushing rags through the tapped hole in the base, in case some polish got in there). You can always do more in the future if you get more critical.

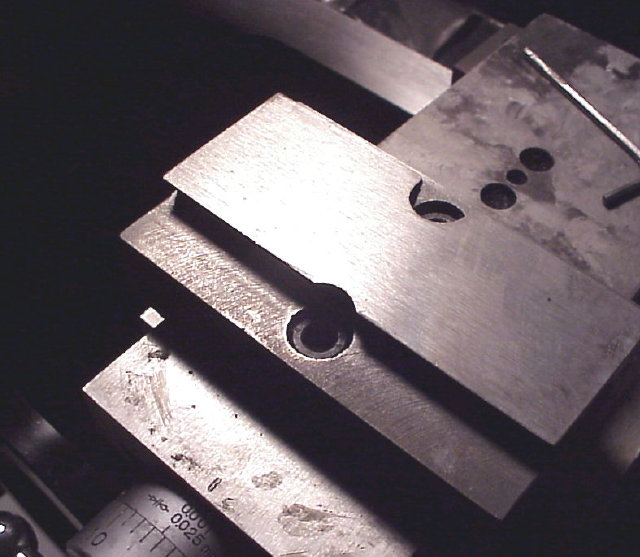
The second photo shows my final result on the compound. Only about 40% of the surface is now in contact so I could have gone further, but the results are incredibly better than before, and I can always do more someday.
The Cross-slide
The cross-slide is lapped just like the compound, only it’s larger and you have to remove the splashguard. Also, because of the much larger area and thin cross-section of the cross slide, it’s more likely to warp after being machined (and the Chinese don’t let their castings sit for a year before final grinding like the prestige machine-tool makers). So you may have to use coarse abrasive or sanding just to get the cross-slide as flat as the compound started out.
The Carriage
The carriage is very different, because of the way the gibs are attached, with capscrews holding the gibs on and setscrews pushing them away. This method is extremely flawed because the gibs can never be solidly attached, so I decided to get rid of the setscrews and shim the gibs instead.
I have some .005″ brass shimstock, so I used that, but the exact thickness doesn’t matter. I cut 1/2″ by 4″ shims and made holes by clamping the gib on the shims (on a piece of scrapwood), and punching holes with a 1/4″ hollow punch sold as a paper punch. (You can make one by filing a bevel on the inside of a piece of 1/4″ tubing). Before and after punching the holes, I annealed the brass by heating it dull red.
By pressing hard and twisting with the sharpened punch, I found I could make the holes in three shims at once. The only trick about shimming is not to let the shims stick out too far on the inside, or they’ll rub on the bed themselves and make you think the gibs are tighter than they really are. Also, if you’re using thin stock like mine, you have to be careful they don’t get creased when putting them on.
Unlike the compound and cross-slide, I lapped the carriage one side at a time, doing the rear first (which was arbitrary — the reverse might have been better). To lap the carriage onto the bed, first remove the apron. Then shim the gib on the side you’re lapping until it’s a bit loose with the capscrews not completely tight.
Then you can tighten the screws as you lap, and eventually you remove a shim and do it all again. Keep the screws loose on the side you’re NOT lapping, so all the tightness you feel comes from the side being lapping. However, the V-way determines the parallelism of the carriage, so keep some pressure (and oil) on the top of the front V-way when lapping the rear.
On my lathe, the underside of the bed (especially in back) was very crudely finished, so I took off the high spots with a scraper, finding the high spots by feeling for where the carriage dragged. (To try to get these gross irregularities off with lapping would take forever, so I recommend doing it this way if the underside of your bed is also very rough.
You can make a scraper by grinding the teeth off the end of a file, then grinding a 90-degree angle on the end. The top of the bed is precision ground and pretty well finished, so I did almost all the scraping and lapping on the underside.
However, as the job progressed and the fit got closer, I had to scrape a lot where the serial number was stamped on the top rear corner, because the edges of the stamping stuck up enough to make it impossible to get the carriage on and off.
After lapping, I wound up needing 5 shims (approx. .025″) in back. In front, 4 shims was just a bit too tight, so I made another shim from .002″ plastic (from a bag of pasta — it was clear and dimensionally stable). Now, with the capscrews tight, I have free movement of the carriage, zero vertical play in back, and about .001″ vertical play in front. This isn’t perfect, but it’s much better than before, and I can always do it more someday.
By the way, I noticed that removing and replacing the gibs always made them tight for a few passes even when there was no change in shimming. This is probably because they never go on in exactly the same position twice, so there are always microscopic tight spots.
The real solution is alignment pins in the (now empty) setscrew holes, but for now I just did the cleaning of the carriage and gibs after the final lapping without loosening the screws, so the final position of the gibs didn’t shift.
The Apron
The halfnut mechanism on the apron can also be lapped a bit, but this is very crude compared to the other ways and it doesn’t matter very much. On mine, the gib had to be set looser than it should be or the halfnuts wouldn’t close properly on the leadscrew. Precision here is not really needed.
Finally, I discovered that when the halfnuts were closed on the leadscrew, they were slightly higher than the leadscrew and pulled it up, resulting in a lot of drag. There’s no adjustment for this and the leadscrew couldn’t move enough to correct it, so I put .020″ of shims above the right side of the apron, lowering it enough to match the leadscrew without affecting the carriage-transport mechanism on the left.
The apron touches the carriage only on the outside edges, so “L” shaped shims are the easiest here, because they let you adjust the vertical alignment of the right side of the apron without loosening the left capscrew enough to disturb the front-to-back alignment
