Review: Sieg SX2 Mini Mill
Sieg SX2 Mini MIll with Brushless Motor

Introduction
As they have done with the new SC2 7×12 mini-lathe, Sieg’s engineers have taken the basically sound design of the X2 mini-mill and enhanced it with a new belt-drive and brushless DC motor to make the new SX2 model mini-mill.
The structure, components and operation of the X2 mill are unchanged, but the dramatically improved torque of the new motor is a game-changer for this machine, letting you tackle tougher jobs and finish them in less time than with the prior model. That’s great news by itself, but Sieg also has replaced the metal drive gears with a robust and quiet belt drive.
Because the SX2 mill differs from the X2 model only in the motor, electronics and drive train, I won’t provide much detail about the design and operation of the rest of the mill; I’ve covered that information in previous reviews. If you are new to this web site, please refer to the links below for much more information on the mini-mill.
Both of these mills are essentially the same machine, the Sieg X2, differing only in color, branding and accessories included.
General Construction
In most respects, the new SX2 is very similar to my Grizzly mini mill, purchased in January, 2000, but there are some differences other than the drive train:
- Torsion spring to offset head weight (SX2) versus air spring (X2)
- Better quality drill chuck included with SX2
- Table handwheels are slightly different in design
- Table X-axis leadscrew shaft is slotted on left end to engage with power feed
- Spindle protective shield is different in design
- Gib locking handles are slightly larger and different in shape
- Mechanism for locking spindle when changing tools is different
- Gear rack on column is slightly shorter
- Design of head support clamp is slightly different
- Power supply box on rear of column is larger
- Ruler scale on column is mounted on a separate bracket (SX2) vs on column (X2)
These are not necessarily differences between more recent models of the X2 and SX2 – most of them are changes and improvements that Sieg has made over time since 2000.
Electronic Controls
The controls are straightforward:
- Power On/Off switch and Emergency Stop
- Fault indicator lamp
- Power pilot lamp
- Speed control

As on the mini-lathe, the power On/Off switch is under a cover that functions as an emergency stop button. When the mill is running, the cover sits loosely over the On and Off buttons. Punching the red button on the cover stops the mill and resets the motor; to turn it back on the green On button must be pressed.
The Fault Indicator lamp illuminates if the motor stalls from taking too deep a cut. The power supply senses when it is overloaded, and shuts down. To restart the mill, the green On button must be pressed.
Last, but not least, the Speed control knob is continuously variable from 0-2500 RPM. One of the features I like most about the mini-mill is the variable speed control. Unlike the belt-and-pulley arrangement for changing speeds that was common on mills for many years, the variable speed lets you quickly and easily select the speed for the material you are machining.
And sometimes it’s useful to change the speed during a cutting operation, as when making a final light finishing cut at higher speed. When the red Off button is pressed, or when the speed control is turned to zero, the motor comes to a stop very quickly, which makes me suspect that electronic braking is being applied by the motor controller.
Although this mill has the same nominal RPM range (0-2500 RPM) as the earlier models, the HI/LO shift lever has been eliminated. Due to the high power and torque of the new motor it is no longer needed.

Instead, on the back side of the control box you’ll find the fuse holder and a port for the optional digital tachometer.

The mill uses the same tach as the new SC2 lathe, so you could share one between the machines if you use it only occasionally. The tach connects to the port by a screw-on connector.
Three magnets on the back of the tach housing are provided and will hold the tach to the head of the mill – although not as securely as I would like. The logical place for the magnets to attach is to the front of the belt cover, but that puts the tach housing in the way of the vertical fine-feed knob.


A better arrangement might be use Velcro or double-sided tape to mount it on top of the control box, towards the back, so it won’t be in the way of the emergency shut-off button.
Brushless Motor and Power Supply
The big news on the SX2 mill is, of course, the brushless DC motor. In the section below, I provide a little bit of information about the advantages of brushless motors, along with some links to other sites with a lot more detail, if you’re interested.
In practical terms, though, the real advantage is very high torque compared to conventional “brush-type” motors. And, because the motor housing is completely sealed and cooled by convection, there is no risk of metal chips, oil, cutting fluid or other contaminants getting inside the motor to cause trouble.


There’s a good chance that you already know a lot about electric motors (maybe a lot more than I do!) But just in case, I’ll give you a little bit of background info.
On most electric motors made since the days of Edison and Tesla, the rotating shaft has a soft iron core wrapped with many windings of copper wire. Electric current flows through the copper wire to produce a magnetic field that causes the shaft to rotate.
Trouble is, electricity must somehow still be supplied to those windings that are now rotating at fairly high speed. Brushes are a type of “floating” contact that conduct the electricity while still allowing the shaft to rotate.
On most motors, they are made from a tough graphite compound, not unlike a large, industrial-strength pencil lead, that under spring pressure, press against contacts attached to one end of the shaft. The contacts act like a switch, continually turning the rotating coils on and off, to apply the magnetic field at just the right time; somewhat like the rhythm of pushing a child on a swing.
In the brushless motor powering the SC2, the wire coils are mounted to the outside frame and don’t move. Powerful permanent magnets are configured as part of the rotating shaft.
A specially designed power supply applies pulses of current to the coils at just the right time to apply force to the rotating permanent magnets. In this arrangement, there is no need for contact brushes.
Power Supply
Mounted on the back side of column, the power supply / speed control is well-protected from flying chips and cutting fluid. The ventilation holes are screened to keep out chips and bugs.
(Don’t laugh, in my experience, bugs will find their way into just about any open hole and make a nest; especially in a nice warm, dry place like the inside of the speed control box).
Compared to the speed controllers on the early mills, this one is much more sophisticated. It includes built-in overload protection to shut down the motor and power supply if the motor is stalled.

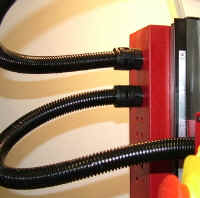
Heavy-duty flexible black plastic cable runs protect the electrical wiring from the usual shop hazards. They are larger and tougher than the ones on my old mini-mill, which are still in good shape despite ten years of hard use.
Head, Column and Table
Nothing really has changed in the basic structure of the mill. Please refer to my earlier reviews for details of these components.
Torsion Spring Arm
Early models of the mill, before around 2002 or so, used a compressed-air spring piston to offset the weight of the head. Since that time, including on this model, the air spring has been replaced by a spring-loaded torsion arm on the left side of the mill.


For my needs, I like the air spring better. The torsion arm does a pretty good job when the head is close to the table and the coil spring is fully compressed, but as the head is moved up the column, the spring unwinds and applies less offsetting force to counterbalance the head.
Near the top 1/3 of the column, the spring offers little support and, unless the gibs for the head’s dovetails are maintained to a snug fit, the head can slide down the column, causing the 3-spoke handwheel to spin, possibly whacking you in the arm or hand.
There does not appear to be any way to adjust the spring tension to correct this tendency, so be sure to keep the gibs snugged up.
My other gripe about the torsion spring is that it gets in the way of making one of my favorite mods on my old Grizzly mill: an adjustable dial indicator to measure depth of a cut or drilled hole.

Maybe it could be moved to the right side of the column, but then the mounting bracket for the upper end gets in the way of the gib screws. And besides, that’s where my Y-axis DI is mounted.

Belt-Drive Spindle
In addition to the new motor, the other big change is the conversion to belt drive. This is a great improvement. On the earlier gear-drive design, a sudden stop of the spindle would sometimes shear off a few teeth from the spindle drive gears. To solve that problem, I upgraded my Grizzly mini-mill with a belt-drive kit, and that change has been a sound investment.
On this machine, the toothed belt and pulleys are large and heavy-duty and should stand up well to the rigors of machining. Belt tension is adjusted by loosening the four cap-head screws on the motor base-plate and pushing back on the motor until moderate tension is applied to the belt; then the screws are tightened. Simple and effective.


Eliminating the gear drive also makes the new mill significantly quieter than its geared predecessor. For most operations the cutting tool probably will be the main source of noise. Like the new mini-lathe, it’s quiet enough that you could use it in a small apartment without bothering your neighbors. There is no cooling fan, so the mill is silent when the motor is stopped.
If you look on the left side of the head, the HI/LO gear shift lever found on earlier models is gone. Due to the high torque of the new motor, it’s no longer needed. In practice, I found that LO range was used for nearly all operations except, perhaps, drilling with very small diameter drills. On the SC2, the top speed is the same, 2500 RPM, but is achieved in one continuous range.
Spindle & Chuck
On the sample I received for this review, the spindle is a #3 Morse Taper (MT3). A quick check of the specs on the Sieg web site indicates that, like the long-established X2 mini-mill, the SX2 also is available both in #3MT and R8 spindle tapers.
Debate over which taper is better can use gigabytes of web bandwidth, but in the end, either taper works fine. Included with the mill is a nicely made 1-13mm chuck and arbor.
One difference between this mini-mill and the earlier ones I’ve used, is the method for locking the spindle when tightening the tooling retaining bolt. For the uninitiated, both MT3 and R8 tooling has a female thread at the top of the taper.
A draw-bolt extends down through the spindle shaft to engage with the thread, drawing and holding the tool tightly in the tapered spindle, so that the tool holder will not work loose from vibration or cutting forces.
To tighten the draw-bolt, you need a way to lock the spindle to keep it from turning. On the earlier X2 mini-mill, a locking pin is inserted into the side of the head, mating with a recess in the spindle shaft. The new SX2 mill uses a short hand-held pin for the same purpose.

As on earlier models of the mini-mill, a simple guard, made from tough polycarbonate plastic, mounts in front of the chuck or other tooling. Unlike the earlier versions, this one has no slot for adjusting the height.
Not too much lost there, though, in my opinion, since both the old and the new version are not very practical if you’re using the mill regularly. I just don’t have the patience to remove and replace the two screws every time I change or adjust the tooling.
Early on, I came up with my own safety shield design that meets my needs much better. You can buy plans for it in the Premium Content section, or, with a little tinkering, can probably come up with your own design. I should add that the guard provided by Sieg is not intended primarily as a shield to keep chips from flying around.
Consistent with their practice on their other machines, the guard is to help ensure that the chuck key is not left in the chuck when the motor is started. My custom shield, on the other hand, is designed primarily to protect your eyes and face from chips and spirals of metal from the workpiece.

Setup and Cleanup
While waiting for a time when I could set up the mill, I stored it on a wood platform with wheels attached. I’ve made a few of these and they’re usually supporting boxes of scrap metal, so that I can move them around for easy access or when cleaning or reorganizing the shop. Thus stored, I could move the mill around the shop when it was in the way, until I had a place to put it.
As I was thinking about how to get the 50 KG (110 lbs.) mill from the roll-around up onto the bench, my lower back spoke to me and said that I would be a fool if I tried to lift it up there without help. Usually, I don’t listen – and pay the price. This time I gave in and resolved to use my shop crane to do the job. With age come aches and pains; and maybe a little wisdom.
Of course, moving the shop crane is itself a job that takes some hefting, pushing and shoving. But its long legs, folded up, can be used as levers to do the hard work, while the wheels let you roll it where needed. I had to lift it over the raised door sill between my garage (where the shop crane sleeps when not in service) and my shop.
That’s where the leverage came in handy. The only problem I encountered, really, was that the legs of the shop crane are too high to roll underneath the HF tool chest that I’m using as a bench for the mill. Fortunately, the tool chest is also on wheels, so I just rolled it out away from the wall and rolled the shop crane over it from the end.
That maneuver positioned the mill (now raised up by the crane) close enough so that I could lower it down onto the bench where I wanted it. Releasing pressure on the hydraulic ram very carefully, you can lower the load by millimeters at a time.

Once I got the crane in place and lashed up the mill with a nylon strap, the lifting was easy. I lifted it up onto the bench with the roll-around platform still bolted to the mil. That was easier than getting down on my knees and trying to remove the nuts from underneath the roll-around.
With the mill now up on the bench, cleanup, as always, was a slow but relaxing process. For new owners, it’s the perfect way to familiarize yourself with all of the mills parts and how they fit together.
Regular readers and experienced users know that all Sieg products are liberally coated with a layer of soft red grease that protects the bare metal surfaces, such as the table surface, column and chuck, from rusting during transport and storage.
The grease is easily removed with some old rags, paper towels and kerosene or WD40. Experience has taught me that its easier to do this job after the machine is at bench height, rather than while sitting on the floor.

I removed the milling table and the rubber “accordion” chip shields to do a thorough job of cleanup and lubrication.

Conclusion
Power is good. Real men know that instinctively, and we want all that we can get. Sure, I appreciate the high-mileage and low-emissions benefits of the new eco-cars, but I grew up in the muscle-car era. Give me a 300+ HP V8 and a stick-shift and I’m happy! We’re not wimps here.


What has that got to do with the new mill, you ask? It’s all about power. The brushless motor on the SX3 is a powerhouse compared to the larger and heavier motor it replaces. On the mill, the extra power often is not as apparent as it is on the mini-lathe.
For most operations, the standard motor has plenty of power for a mill of this size. But, hey, why not have more? (And, Oh, I’ve always wanted to brag about those cars – they were a helluva lot of fun!)
On a job where you need to make multiple passes with a 1″ diameter mill and remove a lot of metal, this new motor will significantly cut down the time it takes to do the job. (Later on, I’ll see if I can verify this statement with some quantified testing.)
Fly-cutting is another job where extra power is sure to help. Even on a small mill like this, a fly cutter may cut a 2″ diameter or larger swath. Very shallow cuts (less than .005″) are the rule. Lacking enough power, you can stall the motor and mess up what would have been a really nice piece of work.
So, do you really need the extra power? If you already have a mini-mill and it meets your needs, hold onto it. It’s a capable machine and, with good planning and proper operation, will do pretty much anything you need within the limits of its size.
But, if like me, the mill is a part of your life and character, you may want to upgrade. The good part is that you’ll be able to sell your current mini-mill for a fair price, making the step up an incremental step; not a leap of faith. Just think, the guy who buys your old mill will become another productive home machinist.
If you’re a first-time buyer, you won’t go wrong starting with the more powerful version. If your funds are tight, or your significant other (that would be your wife or other woman (?) who influences how you spend your money) questions your sanity, you may want to look for a pre-owned mill.
Still not sure? Well, you could be the guy that buys the mill that the other guy needs to sell to move up. Everyone’s happy now – even your significant other.
