Harbor Freight Tool Chest
In 2007, my wife and I bought a small retirement home southwest of Richmond, VA (back when retirement still seemed possible!).
Since then, we’ve gradually been moving pickup truck-loads of stuff from our main house to the new house.
I built a shop in the new house about the same size as my current shop and I needed to start getting some tools and work benches down there.
Thus it was that I decided to move my old Craftsman benches to the new house and replace them in my current shop with new, better-quality benches.
I looked at the usual sources: Sears, Harbor Freight and Northern Tool and soon decided to go with the HF offerings. Technically, these are tool chests, not work benches, but they are strong enough to support a lathe or mill up to about 250 lbs.
and have lots of drawers for storing tools, working stock and accessories. In fact, the top of the chest is rated for a load of up to 1600 lbs. (!) and the chest for a total load of 2894 lbs, nearly 1 1/2 tons.

Harbor Freight Tool Chest SKU #90320
One feature that attracted me to this tool chest was its ability to add optional modular components.
For someone planning to use it exclusively for storing tools and related supplies, the add-on capacity is tremendous, and the main module is sturdy enough to handle a lot of add-ons; I just wanted the extra drawers from the side cabinet.
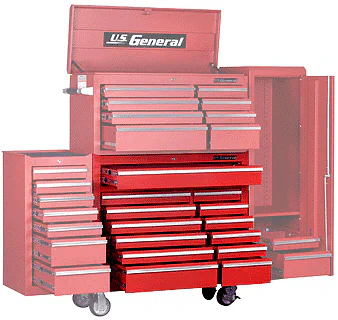
Main tool chest (#90320) shown with optional add-on cabinets
When they went on sale recently, I drove down to the nearest HF store (about 45 mins. from here) and picked up the SKU 90320 and the #90321 7-drawer add-on.
Soon afterwards, I bought a second one that became the new home for my Grizzly mini-mill. I had intended to get another side-cabinet for the second chest, but they have been out of stock at the regional HF store since January.
I had a few concerns: the tool chests are taller and shallower front-to-back than my current benches, providing less bench-top area and potentially being top-heavy when crowned by a 200+ pound lathe/mill such as the C4/M4.
On the plus side, there are a lot more drawers, easily accessible, so I should have less need to leave tools and parts on the benchtop and the narrower profile leaves more floor and aisle space in the shop compared to the benches being replaced.
I’ve been using both tool chests for about 2 months now, so it’s time to report on my experience.
Update 02-15-2014
After five years of use, I’m still really happy with these tool chests. They have lived up to all of my expectations and I have had no problems, even though I use them continually while I’m in my shop about 60 hours per week.
I rarely move them around, so I can’t comment on their durability in a highly mobile environment.
Some time ago, maybe in 2012?, HF changed the paint from the semi-matte finish that mine have, to a high-gloss finish. On all of the chests I bought back in 2009, the paint has a tiny crinkle-finish.
I like the semi-matte finish better, but I suspect that in a greasy environment, such a garage or other repair shop, the matte finish could get grubby-looking over time.
I haven’t actually seen any where that has happened, but it make sense to me that it might be a reason for changing to a gloss finish.
End of update
The Bench Top
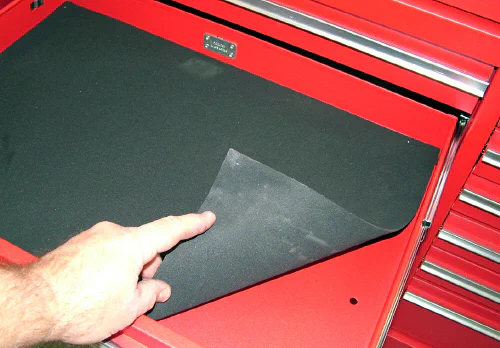
As it comes from HF, a thick, heavy-duty, ribbed rubber mat covers the top surface of the tool chest.
This is just what you’d want if you’re using it as a surface for holding tools while working on automobile repairs or similar work, but is not an ideal surface when using the chest to support a small lathe or mill.
Fortunately, you can simply lift it off if you choose not to use it.
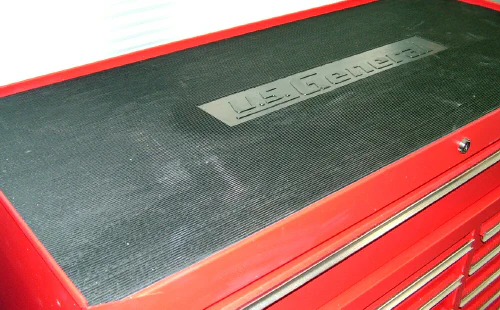
A heavy-duty ribbed rubber mat covers the top
Small drill bits and similar items tend to get between the rubber ribs, requiring agile fingers (or, more likely, a pair of needle-nose pliers or tweezers) to extract them.
And metal chips, the metalworkers equivalent of sawdust, soon fill up all of the recesses and are hard to get out without a shop vac or a blast of compressed air.
Compressed air, as we all know, is not an ideal solution since it merely redistributes the swarf to more inaccessible areas of the shop, not to mention creating an aerosol of fine metal particles to be breathed into our lungs.
So, as on my other benches, I decided to add a pre-fab laminated kitchen counter top. These aren’t cheap, currently at about $50-60 at the big box hardware stores, so I considered just making my own from MDF and laminate.
I had done this years ago, but I soon discovered that the plastic laminate is not carried by the typical consumer stores.
I probably could have special-ordered it, or found it on the Web, but I wanted to move on, so I coughed up the money for the stock items readily available.
Tool chest fitted with laminated counter top
This was a painful choice. On my other benches I at least made use of the entire counter top, but to fit the tops of the HF tool chest, I had to cut off and discard about 30% of the material.
Still, having now done it, I like the end result. The light tan/cream color was not my ideal choice, but I’ve found that lighter colors make it easier to find small objects on the counter top and to expose oil spills before I set my camera down on them.
The Drawers
Having so many drawers is great. I’ve been able to organize things in a more logical order than in the past, and I am much more inclined to put things back in the drawer when I’m done with them, than to leave them on the benchtop.
This is a natural consequence of having more drawers and less bench top, but it contributes to a neater, and probably safer, work area. In any case, my wife thinks it’s a really big improvement.
The main tool chest has 13 drawers in 5 different sizes, all 16" long front-to-back. The top drawer is about 36 1/2" wide x 4" deep; the left-side drawers are 22" wide x 2 1/4" deep and the right-side drawers are 12" wide x 2 1/4" deep.
The bottom drawers on each side are 5 1/2" deep. On the optional side chest, there are 7 drawers with the top 5 being 12" wide by 2 1/2" deep and the bottom two 5 1/2" deep.
These are the inside dimensions, or the actual storage space, so the outside dimensions are slightly larger.
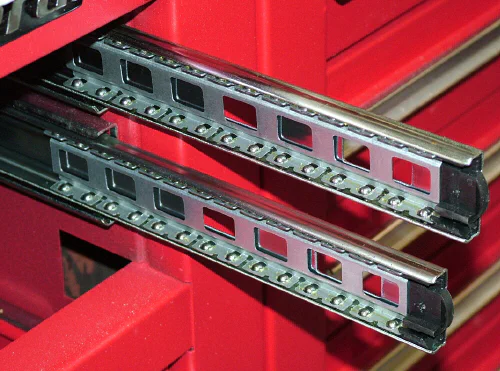
Double ball-bearing slides on all the deep drawers
All of the drawers have full-length ball-bearing slides so they glide smoothly in and out, and are fully accessible all the way to the back end of the drawer.
The deep drawers all have double slides on each side. On lower-cost tool chests, like my old Craftsman ones, the drawers often use non-ball-bearing slides and do not extend all the way out to the back end of the drawer.
These are much nicer. There’s a detent somewhere along the slide that gives a slight “clunk” feel when the drawer drops into it’s fully closed position.
The detent keeps the drawers from sliding open should the tool chest be rolled around the shop to a new location.
Like all of the deep drawers, the top drawer uses two ball-bearing slides on each side for extra strength and support. Unlike the smaller drawers, it has a tendency to wobble side-to-side, so it’s best to stand near the center and use both hands to open and close it.
All of the other drawers have a good solid feel with little wobble. They are rated for 88 lbs. capacity for the smallest drawers up to 110 lbs. for the larger drawers and 120 lbs.
for the wide top drawer.

The wide top drawer has double slides on each side
Provided with the tool chest are thin foam rubber drawer liners for each drawer. HF sells drawer liners as a separate item and I nearly bought them - but they aren’t needed.
Foam rubber mats are included for each drawer
While they do a good job of keeping tools from denting the bottoms of the drawers and absorbing the sound of tools dropped into the drawers, I found that the foam inserts have a tendency to slide back and curl up near the back end of the drawer.
This was easily remedied by running a bead of glue (I used Quick Grip from the crafts department at Wal-Mart) under the front portion of the inserts to hold them in place.

A little quick-drying glue keeps the mats from sliding
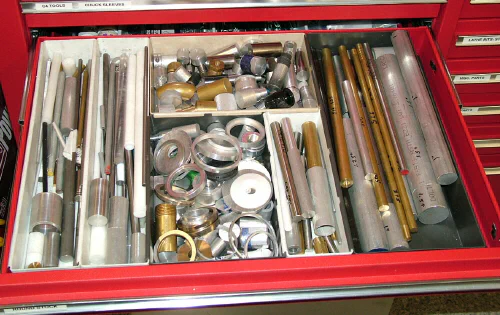
It took some time to figure out the best allocation of tools and parts among the drawers. Obviously, you want to keep the tools that you use most often readily at hand, so I keep them in the upper-most of the small drawers.
The top drawer, so far at least, has ended up as sort of a catch-all, for things like drill bit sets, boring tools and chucks. I need to do some more thinking to make best use of the space.
One thing that I really liked: the drawers were just the right size to make efficient use of my ever-growing collection of interlocking drawer organizer inserts.
The ones shown below are made by Rubbermaid and are available at Wal-Mart.
Plastic organizers fit nicely
Recently I found a set of 10 at Lowes that I like even better - they are more rugged, interlock more tightly and at about $10 for the set of 10, less expensive.
Although the white ones show dirt more easily, they also make it easier to distinguish small parts that are in the bin. They also interlock with the Rubbermaid type, but I have not seen them in the larger sizes that the Rubbermaid ones come in.

Another brand of organizer inserts from Lowes
Here’s another type of organizer that fits the drawers just right…

One-piece organizer with 7 compartments
If you ever find it necessary to remove any of the drawers, if, for example a tool dropped over the back edge of a drawer, there’s a flexible plastic spring lever on each of the ball-bearing slides that can be pressed to release the drawer from the slide.
Once that’s done, you can lift the drawer out and set it aside. If the contents of the drawer are heavy or subject to spilling, it’s best to remove them first.
Replacing the drawer is just a matter of mating the rails on the sides of the drawer with the ball-bearing slides and pushing the drawer gently back into place.
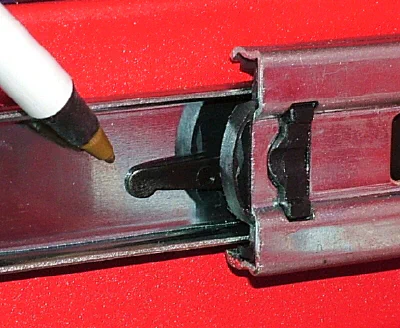
Lever releases drawer from slide
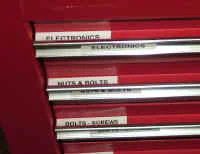
Also included for each drawer is a white plastic strip with a frosted surface, suitable for writing on, and a matching clear plastic strip to serve as a cover.
These are intended to be used for labeling each drawer by its contents.
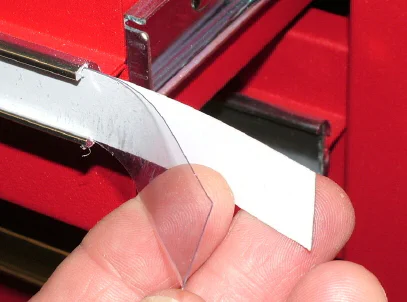
Label strip and clear cover strip
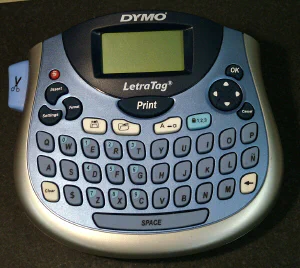
With so many drawers, and especially when I was still getting used to what was in each drawer, content labels were a great help. However, this became a big enough factor that I decided to buy a Dymo label printer from Wal-Mart just for that purpose.
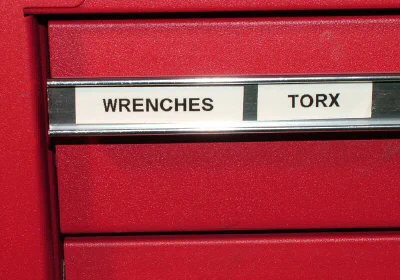
Drawers with Dymo labels
Update 02-09-12:
When I’m working at the benches (that would be often!) I found that I can’t see the labels on the fronts of the drawers.
In my never-ending quest for a more efficient shop layout, I swap drawers around from time to time, so I need to be able to see the labels to keep track of what’s where.
Therefore, I added labels on the tops of the drawer handles. I can read these from directly above and also from a few feet away.
The Dymo labels don’t stick well to the pebbled painted surface, so I first brush on a thin layer of clear nail polish to establish a smoother surface for the labels to stick to.
Labels on tops of drawer handles
End of Update
Drawer Locks
Both the main tool chest and the optional side-chest have individual keys that are not interchangeable.
The keys look like they are of decent quality and, although I haven’t tried, I’d guess the locks would not be easy to pick with a tool, unless you specialize in that sort of work.
They should be more than adequate for keeping unauthorized users out of your tools if you work in a shared space or have children, teens or others in the house who may come looking for a screwdriver.
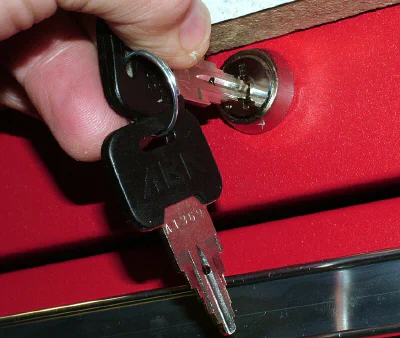
Locks and keys are unique to each tool chest
All of the drawers must be fully closed before the chest can be locked. Sometimes, one or more drawers will be slightly, but not obviously, open, requiring a check of them all before the lock will engage.
This avoids a false sense of security: when the chest is locked all of the drawers are locked. As a further security precaution, the lock contains a spring that ejects the key when you release your grip on it, thus preventing you from leaving the key in the lock unintentionally (or intentionally).
Since security is not generally an issue in my shop, I just keep the keys in a small tray in one of the top drawers, readily at hand if I should ever need them.
Side Handle, Wheels and Attachments
Standard with the main module is a strong and nicely finished bar handle with a rubber grip for pushing and/or pulling the tool chest around the shop.
While I don’t often change locations of my work benches, once I find a setup that works, I often need to move them for other reasons: retrieving objects that have dropped behind them, out of sight, running power cables behind them, cleaning the shop floor or, in the case of the C4 lathe, gaining access to the adjusting screws for the plates that clamp the carriage to the ways.
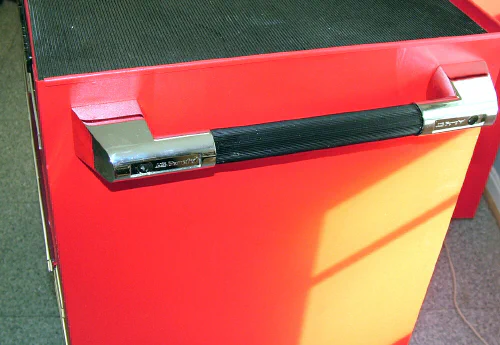
A sturdy handle for moving the chest around the shop
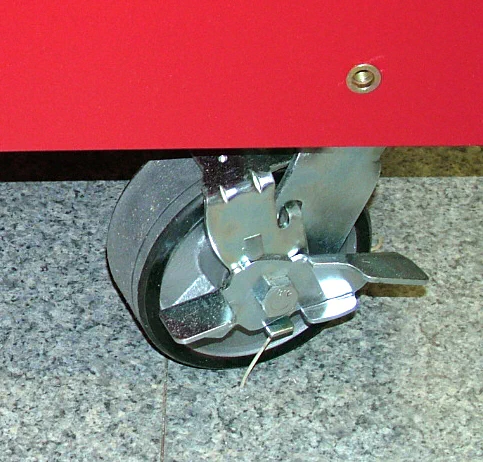
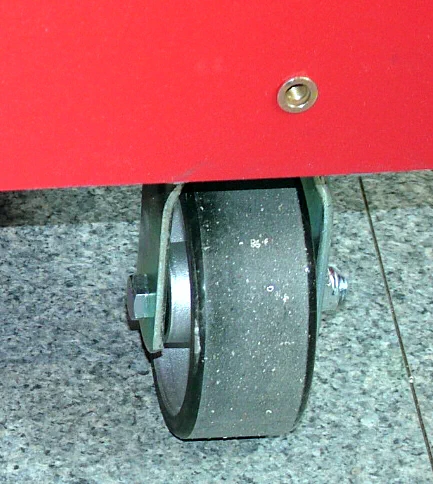
The wheels are wide cast metal with a rubber tread and grease fittings for lubrication. Looking at the front of the chest, the wheels on the left side are fixed in line with the length of the chest, while those on the right side are free to rotate 360 on ball-bearing races.
The right-side wheels can be locked with a foot-operated brake to keep the chest from moving once it’s located where you want it.
Attaching the Add-on Cabinet #90321
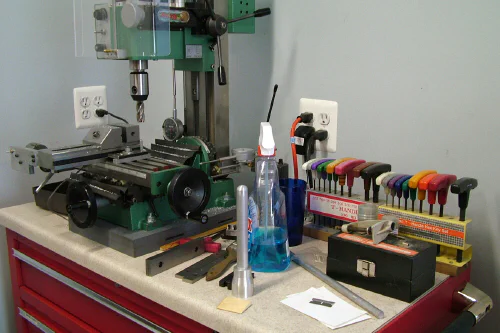
The optional 7-drawer side cabinet is a quick and easy addition that gives you about 25% more capacity, including two deep drawers. Besides the extra drawer capacity, I also wanted the extended top surface for work space.
I use the space next to the C4 lathe for my granite surface plate and layout tools. Due to the limited space, the surface plate must span the gap between the main chest and side cabinet, but it works out fine in use.
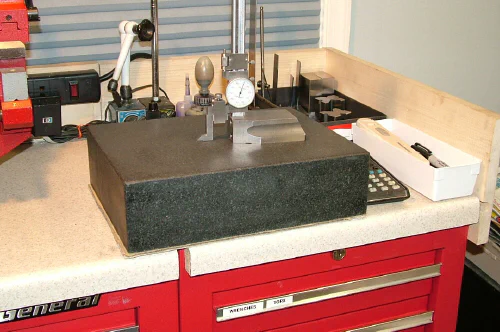
Layout tools on top of side cabinet
The side chest has a heavy metal lip that hangs onto the top edge of the main chest. Then the two are bolted together by two bolts down near the wheels.
Delivery and Installation
Large and heavy, this is not an item that you are likely to want to pay to ship from the HF catalog, so you’ll need a pickup truck, trailer, van or SUV to move it from your nearest HF store to your home or shop.
If you plan to use a van or SUV, make sure before you leave for the store that you have enough vertical clearance. The packing box is marked with arrows indicating that it should be shipped upright, and that’s how I did mine.
I’m not sure if any problems would occur if it was turned on it’s side, and I wasn’t interested in finding out - I just wanted to get it home.
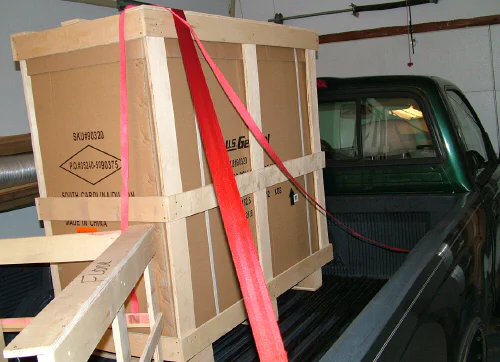
Unloading the tool chest from the pickup bed
When you go to pick it up you’ll want a good supply of cargo straps, rope or cord to anchor the box securely during the trip home.
Of course, since you’ll be at HF, you can buy these while you’re there, if you don’t already have them.
However, I’ve bought some cargo straps there, and from other sources such as Wal-Mart, Home Depot and Lowe’s, and I like the other ones better than the ones from HF, so be forewarned.
The box is very heavy. HF lists the gross weight as 460 lbs. and the net weight as 400 lbs.; considerably more than the the mini-lathe, mini-mill or even the big C6 lathe.
Getting it into the truck was easy: two strong guys from HF just muscled it onto the bed, but you’ll need to think ahead about how you’re going to get it out of your vehicle into your shop.
Regular readers of mini-lathe.com know that my shop presents some special challenges, and this one was harder than average due to the height and higher center of mass than you would have unloading a lathe or mill.
I used my trusty ramp and winch system to move it from the bed of the pickup truck into the shop; a job that took me longer than the drive home.
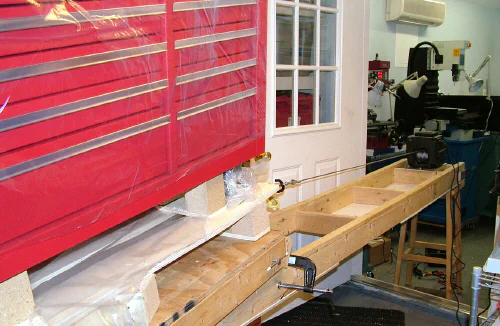
Using the ramp and winch to pull the chest into the shop
Be careful when unwrapping the protective plastic from the wheels: inside the plastic are small bags of silica gel beads to protect the wheels from rust during shipment and storage.


Not knowing that, I accidentally broke open some of the bags, releasing hundreds of silica gel beads, like invisible ball-bearings, onto every inch of the shop floor.
No, that’s not how I sprained my ankle.
Conclusion
Overall, I’ve been pretty satisfied with the HF tool chests. The wobbly top drawer could be improved, but it works fine once you get used to the idea of using both hands to open and close it.
The other drawers all work well and offer a good choice of widths and depths to accommodate most of my tools.
There are a few tools, such as the boring bar set with 1/2" shanks for the C6 lathe, that are too tall for the drawers, but I solved that by simply removing the two tallest ones from their holder and placing them flat in the drawer.
The narrow profile makes it less stable than would be ideal for supporting heavy machines, but keep in mind that this is a tool chest, not a machine stand.
It can easily and safely accommodate a mini-lathe or mini-mill, but the C4 lathe is about the largest and heaviest lathe that I would consider safe to use on it.
With the drawers loaded with tools and other materials, there’s enough mass below the lathe to provide a stable base.
According the rated capacity, the top shelf is capable of supporting heavier machines, so you may want to try that - but be careful!
When used as a machine stand, the tool chest, at 39 1/2" high, is higher than I would like. I’m only 5" 6" tall (all muscle, though!) and I find that a bench about 34-36" high is best for lathe work.
At that height, the lathe controls are about 42-44" and my forearms extend at a comfortable horizontal reach.
When I work on the C4 lathe on the HF tool chest, my arms and shoulders become fatigued after a while from having to work in a raised position.
I’ve been experimenting with standing on a platform, just high enough to slide under the tool chest when not in use. That brings me up to the equivalent of having the cross-slide at 42", same as on my C6.
On the plus side, the chest holds a lot of tools in a more organized and quickly accessible format than any of my earlier benches.
That contributes to a more orderly (and therefore safer) as well as more efficient workspace, since I spend less time digging around to get to the tool I need.
The narrow vertical profile takes up less floor space while holding more tools and supplies than the bench that it replaced, resulting in a much-needed net gain of shop space.
If I change my mind about the layout of my shop, or just want to do a thorough cleanup of the floor, I can roll the chests to wherever I want them.
The quality of workmanship is very good; especially when you consider the relatively low price compared to similar offerings from other vendors.
I have no doubt that these tool chests will outlive me and be in productive use for 30 years or more.