Mini Mill Spindle Lock
markdown
Mini Mill Belt-Drive Conversion Kit
You are visitor number
since 03/19/06
Copyright 2006 by Frank J. Hoose, Jr. Home
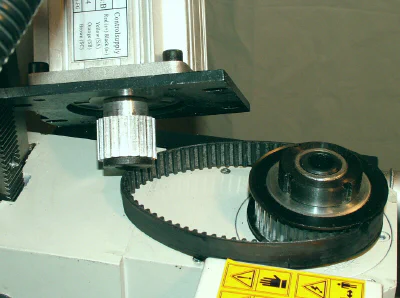
Belt drive kit installed on mini-mill
How to Break Gear Teeth
I’ve had my mini-mill for about six years now, and it is an indispensable part of my shop. Mine is one of the early Grizzly models: Grizzly Green with a gas strut and #3 Morse Taper spindle. Even though I now also have a larger Sieg X3 mill, the mini-mill still gets frequent use.
As much as I like the mini-mill, it has a few shortcomings. By far, the single biggest point of failure and frustration has been the 2-gear drivetrain that couples the motor to the gearbox in the head. The problem is that any time you feed a cutting tool too deeply into a workpiece, there’s a risk of shearing teeth off of one or both of the drive gears. The only good (?) thing that can be said for this is that, in most cases, the shearing of those gears occurs before a similar fate meets the gears inside the head. Now, when those break, you’ve got a fairly expensive and time-consuming repair job ahead of you. Either way, it’s likely that work on your project comes to a halt until you get some replacement gears from LMS. So common was this occurrence that I got in the practice of keeping a spare set of gears on hand.
Some of you may be quietly chuckling, thinking to yourselves, “Well, duh, why not just be careful and not crash the tool into the work?” Well, I’ll admit that I’m impatient, but when working with machine tools I do make a real effort to be careful and to think ahead. Even so, at least once a year, I have an “incident” with the mini-mill where things don’t go according to plan. Most often, this happens while using a fly-cutter. I like the nice surface-finish that a fly-cutter provides, and I have a small set that I use when the job calls for it. The largest of these sweeps a diameter of about 1.5". At that diameter, even a shallow cut of 0.003-0.004" can be enough to bring the spindle to a sudden stop and shear off some gear teeth. The other source of trouble is forgetting to lock the headstock before beginning a cut. This oversight is almost guaranteed to cause trouble and break some gear teeth.
How About a Belt Drive?
Since about the first month that I got the mini-mill I’ve been thinking about converting it to belt-drive. One well-known advantage of a belt-drive, of course, is that the flexible belt acts as a shock absorber in the drive train, eliminating or greatly reducing the chances of shearing gear teeth. Several years ago, Brett Fleming published a web page detailing his design for the first mini-mill belt conversion that I had seen. As tempted as I was to follow Brett’s lead, it was one of those projects that always seemed to get deferred to some future time.
More recently, I heard about a belt-drive conversion kit from Ron Sterling, of Sterling Steele. Ron is one of the innovators who have formed a cottage industry making various adaptors, enhancements and conversion kits for the mini-lathe and mini-mill.
Early on, he converted his own mini-lathe and mini-mill to CNC and now he uses those automated tools to crank out parts for some of his other innovative offerings, including a belt-drive conversion kit for the mini-mill.
By the way, Ron also sells CNC conversion kits for both the mini-lathe and mini-mill.
One great thing about Ron’s belt-drive kit is that you can install it in under an hour (maybe even a half-hour if you’re real familiar with the mini-mill.) The components are rugged and nicely machined. Thirty years from now, my son and grandsons will probably still be using it.
As an added bonus, the belt drive makes the mini-mill significantly quieter in operation, since it eliminates all of the noise from the gear train.
Installing the Belt Drive Kit
Installation is pretty straightforward as there are no holes to drill or other modifications to the stock lathe. If, for some reason, you decided to convert back to gear drive, you just reverse the installation process.
But I’ll bet you a set of broken gears that you never go back!
The kit includes four pages of detailed instructions for installing the belt drive, so I won’t attempt to rehash all of the details here. Here are the basic steps:
- Remove the motor mounting plate (the plate is not used with the belt drive)
- Detach the motor from the motor mounting plate
- Replace the gear on the motor shaft with the small step-pulley
- Attach belt-drive mounting assembly in place of motor mounting plate
- Loosen and remove large splined nut from top of spindle shaft
- Install large step-pulley onto spindle shaft and secure with splined nut
- Install drive belt between pulleys
- Mount motor and locking handle onto belt-drive mounting assembly
- Adjust belt tension and lock handle
- Install belt safety shield
Although there are more details involved, that’s pretty much it. On my mill, I have a chip shield mounted to the front of the head that interfered with the safety shield for the belt drive.
After fooling around for a while, I concluded that the safety shield provided with the belt drive kit was just not going to work with my setup, so I simply fabricated another shield from some scrap aluminum sheet.
It’s not very elegant, but it does the job.
One thing that was not immediately apparent to me is that the belt drive bypasses the HI-LO gears that are mounted inside the head. When the belt drive is installed, the HI-LO shift lever is positioned so that those gears no longer engage with the spindle.
The pulley ratio of the belt drive kit has been engineered so that you can do all normal milling and drilling operations within the low speed pulley settings (0-1700 RPM), so you should not need to move the belt very often.
By moving the belt up to the other set of pulleys you can run the spindle at high speed (0-4300 RPM). These speeds are so fast that they should not be used for milling operations, but can be useful for drilling with very small drills, engraving and polishing.
Installation
Conclusion
The spindle lock kit is currently priced at 21.95 from LittleMachineShop.com. It’s a nice addition to any of the Sieg-made mini-mills from Grizzly, Homier, Harbor Freight, Cummins and Micro-Mark.
If you have not already sheared off one or more sets of gears, now would be a great time to take pre-emptive action to avoid this ugly scenario. Believe me, when it happens it will ruin your whole week while you wait for those new gears to arrive.
Mini-mill:
Accessories
Capabilities
Features
Introduction
Operation
Maintenance
Modifications
Projects
Reviews
Setup
Versions