Harbor Freight Hydraulic Table
The Harbor Freight 1000 lb. capacity hydraulic cart had been in my sights for several years as a handy way to move heavy machinery around the shop.
Unfortunately, the shop in my previous home was separated from the garage by several vertical obstacles: a raised concrete landing at the back end, then a door sill, then a drop to the shop floor on the other side of the door, so the cart was not a practical tool for that layout.
Instead, I used a 10-ft. ramp I made from 2x4’s along with a winch to haul things from the garage into the shop and up onto a bench top.
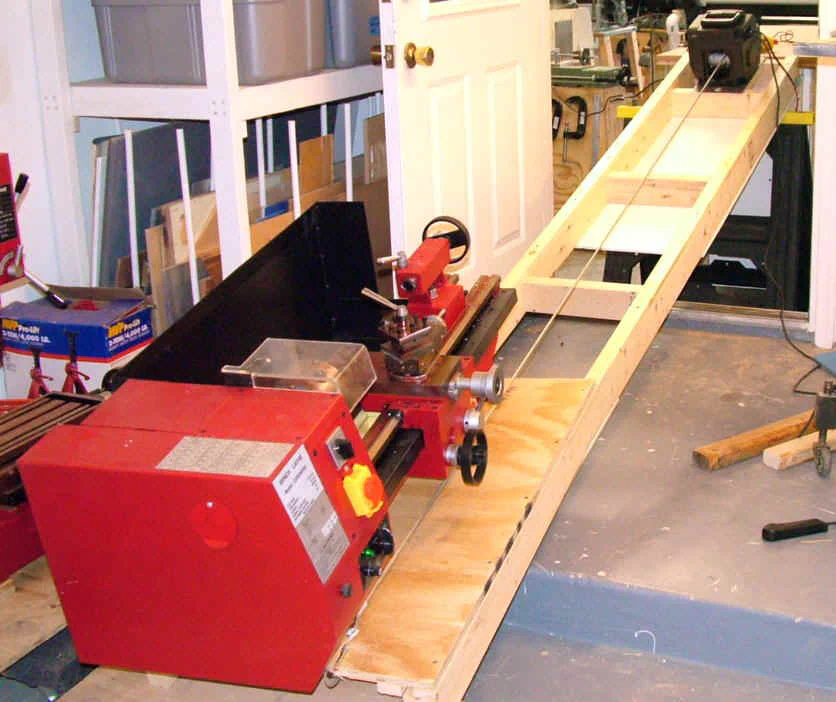
Moving the C6 lathe into the old shop
I also purchased and used a Harbor Freight folding shop crane for lifting and moving machines within the shop.
It works well, but the long legs make it somewhat awkward to maneuver in a small space filled with benches. For safe lifting, the legs need to be under the load, which is not always easy to arrange if the bench is too wide for the legs to straddle and there’s less than 7" clearance under the bench.
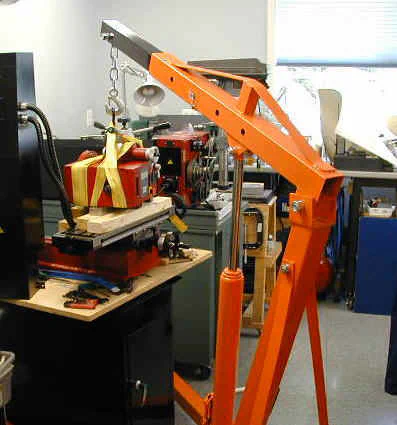
Using the shop crane to lift the SX3 mill head
I retired in 2010 and we moved to a new retirement home near Richmond, Virginia. When dreaming of retirement, I had always envisioned a house in the country with room to spread out and a large, well-equipped shop.
My wife, it seems, had a somewhat different vision of a nice compact home in a subdivision, with modern conveniences. After lengthy discussions, it came to pass that my wife’s vision prevailed.
How about that?
We compromised though: she could have the house she wanted as long as I could have a shop at least as big as the one in our pre-retirement home. We found a nice home under construction.
It had everything my wife wanted, and I could modify the plans to convert what would have been an extra bedroom into my shop.
The new shop is a straight shot through a doorway from the garage with just a 1" sill between the two, so my interest in the hydraulic cart was renewed.
To make the pathway from the garage to the shop even easier, I installed a set of aluminum ramps on both sides of the door sill.
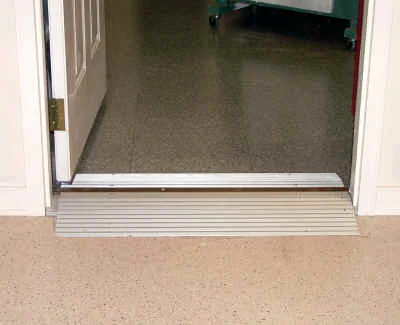
Threshold from garage to the new shop
The aluminum ramps were from two kits that I purchased on eBay from seller discountramps.
Each kit consists of a number of interlocking aluminum extrusions that can be joined to match the height of the door sill. A few screws hold them in place. They’ve been in use for over a year now and have been great - rugged and maintenance-free.
With such convenient access from the garage to the shop now at hand, I made my move and bought the 1000 lb. capacity hydraulic cart.
Construction and Use
So let’s take a closer look at the cart. Basically, it consists of a strong welded steel scissor-type support frame driven by a hydraulic cylinder. With a load in place on the table, the cart can be pushed smoothly and easily along a shop floor using the folding chrome-finish steel handle.
If the load is more than about 30 lbs. it’s best to lower the table all the way down, for maximum stability and safety, before moving the cart.
One common use of the cart is to lift heavy loads, up to 1000 lbs. (450 kg), up to a workbench or other raised surface. To raise the table, simply pump the foot pedal located below the steering handle.
Each pump lifts the table about one inch (2.5 cm), and it takes about 25 pumps to fully raise the table. The amount of leg power required increases with the weight of the load, but even with an 800 lb. load (the heaviest I’ve tried so far) the effort required is modest. After each pump stroke, the table remains at the level it was raised to.
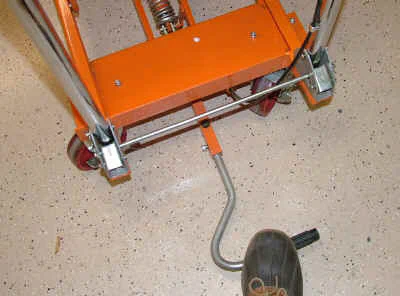
Pump the foot pedal to raise the table
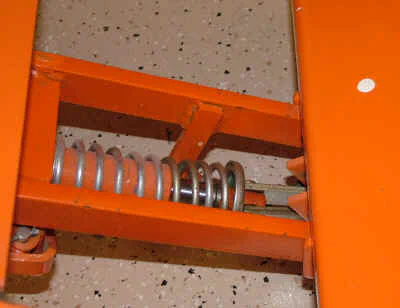
A powerful spring returns the pedal
As the table is raised, the supporting scissor arms move closer together. The front ends of the cross bar are hinged and back ends have rollers that move along a track.
In the fully lowered position, the top of the table is about 8" above the floor, and in the fully raised position the table is about 30" above the floor.
The table is lowered by gently squeezing the handle, much like a bicycle brake handle, mounted at the top right corner of the steering handle.
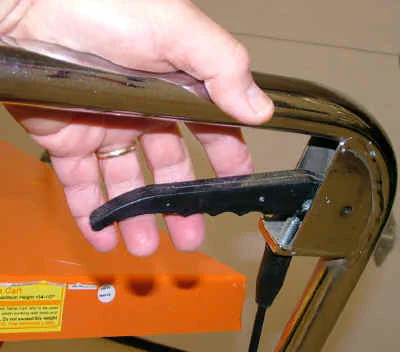
Squeeze the handle to lower the table
When the handle is squeezed it pulls on a cable that releases a valve on the hydraulic cylinder.
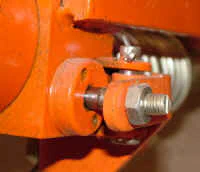
Hydraulic release valve
With careful control, you can easily lower the table by fractions of an inch (a few mm) which makes it easy to bring it level with a bench top or another surface.
Or, if you fully depress the handle, the table will quickly and smoothly descend its full height in 2-3 seconds. Moving that quickly, the table will jolt when it hits bottom, so a slower descent at the end is recommended for most loads.
When the table is fully lowered, you can step on a cross-bar to release the handle and lower it for storage.
Handle in the folded storage position
Made of cast iron with synthetic rubber tires, the wheels roll smoothly over most floor surfaces and have never created any marks that I’m aware of, but I’d do some careful testing before driving it across my wife’s hardwood floors.
The rear wheels swivel for steering and can be locked with a foot lever to keep the cart from rolling. The front wheels are fixed in place. This arrangement makes navigation in tight spaces interesting.
I find that I often have to work the cart back and forth to get around corners or past workbenches and other obstacles in the shop. Like most things in life, this operation gets easier with practice.
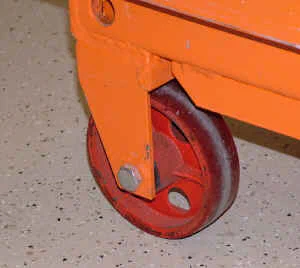
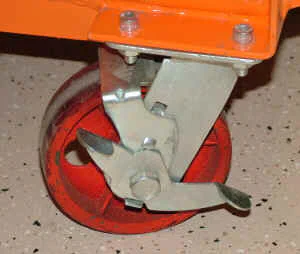
Front and rear wheels
The cart comes standard with a heavy ribbed rubber mat to cover the steel table surface. The day I went to buy the cart on sale at HF, they were sold out, with only the display model still on-hand.
The store manager offered me a discount on the display model, which I accepted, but it was missing the rubber mat.
That was not a problem for me, since I had several similar rubber mats that I had removed from my HF tool chests, replacing them with laminated counter tops cut to fit in their place.
After using the rubber mat on the lift cart for a while, I soon decided that I wanted a laminated top for the cart, much like I had made for the tool chests.
I cut down a pre-fab countertop to the appropriate size and added 1x2 poplar strips on 3 sides, cut so that the top is held in place by the four sides (the 4th side already had a pre-fab lip).
The cover can be lifted off if it is not needed or in the way, but I find that I keep it in place nearly all the time.
Moving the C4 Lathe
Some time ago I decided to sell the Sieg SC4 lathe. I’d had it for several years and it’s been a great lathe, but I also have the smaller Micro-Mark 7x16 and the larger Sieg C6 10x22 lathe.
The SC4 is mid-size between the other two and therefore is somewhat redundant. After I converted the C6 lathe to variable speed drive and variable speed power feed, I found that I just was not using the SC4 much any more, and I needed to free up some bench-top space.
A good friend of mine back where I used to live in the Virginia suburbs of Washington, DC bought the lathe, and I agreed to bring it to his shop in my Tacoma pickup.
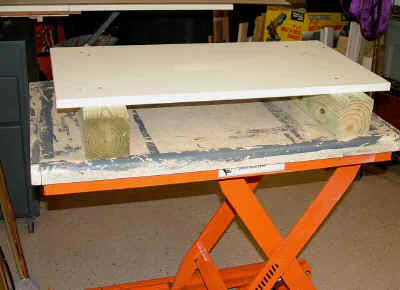
First, I positioned a pair of 4x4’s on the hydraulic table, since the table’s maximum height is about 4" lower than the surface of the HF tool chest on which the SC4 was located.
Even with the 4x4s in place, the table was still a little low, so I positioned some 1x2s on top of the 4x4s.
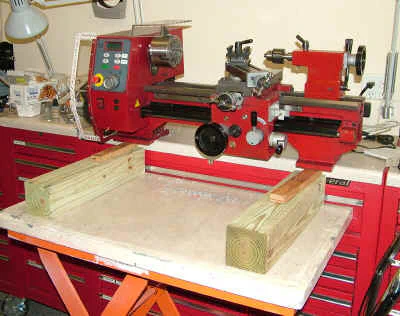
Table positioned next to SC4 on HF tool chest
Next I slid the tailstock end over onto one of the 4x4’s then slid the heavier headstock end over onto the other 4x4 and then removed the 1x2s. The lathe slid easily on the laminated top that I added to the tool chest.
I used some 1" cargo straps to lash the lathe securely to the table, then lowered the table for stability and rolled it over the threshold of the shop door into the adjoining garage.
The straps are the type without hooks. I got them at Lowe’s, Task Force item #0106649, which I use for a number of jobs around the shop.
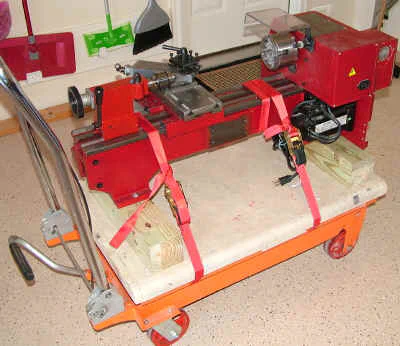
SC4 securely strapped to the table
Ceiling Hoist
Not long after I moved into our new home, I installed a HF 1100 lb. capacity hoist in the ceiling of the garage. The hoist is for loading and unloading heavy machines from the bed of my 1999 Tacoma pickup. (More on that in another article…).
Since I buy and sell machine tools on a regular basis, having this type of capability makes life much easier. Using the hydraulic table together with the ceiling-mounted hoist made the job of loading the lathe into the truck easy while working alone.
I decided to lift the lathe together with the cart into the back of the pickup using the overhead hoist. I needed the cart to move the lathe into my buddy’s shop at the other end of the trip, so why not just keep the lathe in place on the cart?
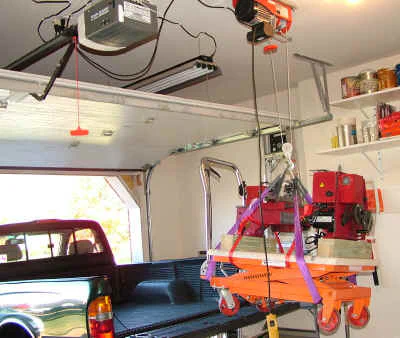
Using the ceiling hoist to load the lathe into the truck
The hoist is rated for 1100 lbs. so this was not a particularly heavy load for it.
Warning: if you consider doing a similar installation, you must ensure that the ceiling is capable of handling the dynamic load; above and beyond the static weight of the object being lifted.
You should consider having a professional engineer verify the safety of your installation before lifting heavy loads. The cost of hiring an engineer is small compared to the damage a collapsed ceiling can cause.
Warning: When lifting heavy objects, the instantaneous force on the cable and the supporting structure (in this case, the ceiling above the garage) may be much greater than the static weight of the objects being lifted.
In my installation, there are 8-foot lengths of steel SuperStrut supporting the hoist and spreading the load across a wide area of the ceiling. Additionally, there is a steel I-beam across the width of the garage very close to where the hoist is located.
My house was newly built in 2007, so I was fortunate to be able to have the engineer who designed the roof structure check out my installation and verify on site, using a computer program, that it can safely handle much more than the 1100 lb.
rating of the hoist. Every component, such as the bolts that support the hoist, must be rated accordingly.
From previous projects, I had a piece of 3/4" plywood cut to fit the bed of my pickup and laid that out over the plastic bedliner so that the cart could easily be rolled to the cab-end of the truck bed.
I placed another piece of 3/4" plywood between the lathe and truck cab to make it safer if I had to brake suddenly. Once the table was in the bed of the truck, I secured it with several more cargo straps to tie-downs mounted in the truck bed.
With that done, the whole assembly was safely secured for the drive up Interstate 95.
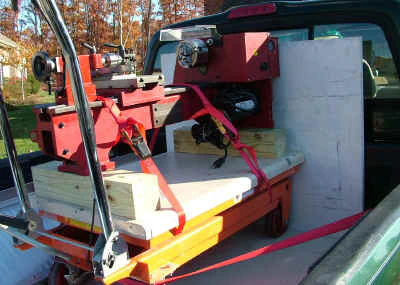
Lathe and table secured in the pickup bed
I took a pair of HF aluminum ramps with me in the truck. Using a strong nylon rope to control the descent of the load, and with my buddy helping to steer it down the ramps, the whole assembly was easily unloaded.
Now for the interesting part: my buddy’s shop is in his basement, accessible through a ground level patio door, but to get to the door we had to move the lathe across about 20 feet of lawn.
The lawn was fairly soft and the wheels of the cart would quickly sink into the dirt if we tried to roll the cart across the grass. Fortunately, one of my neighbors has a pair of the same HF ramps that I have.
I borrowed his set and took them with me along with my own set.
Once the lathe was down off the truck bed, we simply flip-flopped the pair of ramps to make a moveable highway along which we rolled the hydraulic cart with the lathe attached.
Unfortunately, I got caught up in the project and forgot to take any pictures, but you get the idea. Once inside the house, we were able to roll the cart most of the way to the shop, with just a brief interlude to hop over a landing in the stairway.
Other Uses for the Cart
As it turns out, I have found many more uses for the cart than I ever anticipated. During a recent major rebuild of my 1970’s vintage Craftsman radial arm saw, I used the table and ceiling hoist to raise the saw up to a convenient working height to remove the stamped steel support legs. (More on that project in a later article…)
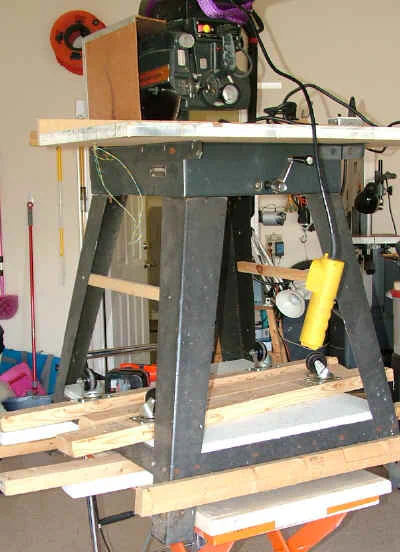
Using the lift cart to work on the radial saw
Similarly, I used the cart to raise up my barbecue grill in order to do some maintenance on the underside - a project that would have been a literal pain in the butt if I had to do it lying on my back.
When I bought the hydraulic table, I only envisioned using it for the occasional move of a lathe or mill. Much to my surprise, the table has proven useful for all sorts of chores around the shop.
In the photo below, I’m using the cart to transfer a bin of drill rod stock onto the wire rack shelves where I store them. While not especially heavy, the bin has enough metal in it that it tends to flex, making it awkward to carry or move by hand.
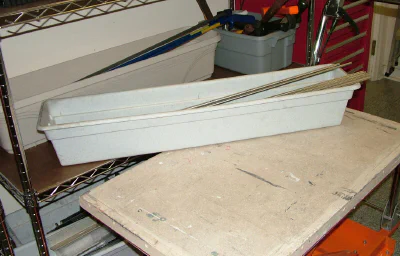
Moving a bin of drill rod stock onto a shelf
Now that I’m over sixty, I guess I’m officially an “old man”, though I feel, emotionally at least, like I’m 37. That feeling is betrayed when I try to bend down to work or pick something up off the floor (assuming that I can find it, since I can’t see very well anymore!).
Clearly, gravity has gotten stronger over the years, because getting up from a crouching position is not as easy as it once was. No doubt this is some obscure side-effect of global warming.
Now, instead of bending over to paint an object, I simply place it on my anti-gravity table and lift it up to a comfortable working height.
Not only is it more comfortable, but the work goes faster, as I can see it better and adjust the height to the most comfortable and convenient level for each part of the job.
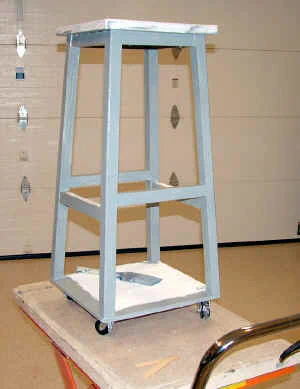
Painting a shop stool on the hydraulic table
The table also makes a handy roll-around work cart.
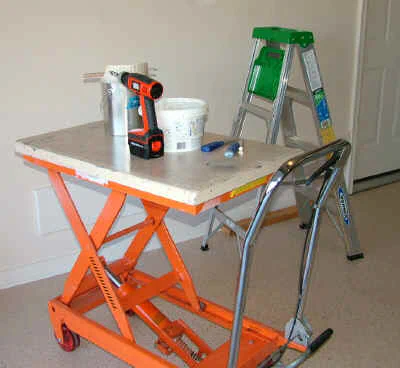
Yet another use for the cart
With the new folding table extensions on the radial arm saw, I found that I can now use the hydraulic table to support a limber 4x8 sheet of material for ripping.
With the edge of the material lined up with the saw fence, I roll the cart along the front of the saw table. The new plastic surface on the table enables the material being cut to slide easily along without grabbing the table.
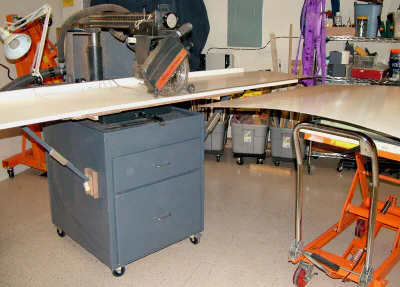
The table at full height is a few inches lower than the RAS table, so I screwed a pair of 4x4’s and a scrap piece of the melamine table material to the cover of the hydraulic table to bring the height up to match the RAS table.
The screws are temporary, but I may decide to make this a more permanent setup at some point.
Hydraulic Fluid Leak
Note: the comments in this section used to be in the Conclusions section. Since I still have not found a way to permanently fix the leak, I decided to give it its own section so I can post new developments, if any.
The only problem I’ve had with the table is a slow hydraulic leak that causes it to descend from the raised position to the lowest position over a period of hours.
The motion is so slow that it’s not a problem while I’m working, but if I set up a job and come back a few hours later, it will be an inch or so lower.
A few times, when I parked the table for the night next to the wire rack shelves in the shop, the edge of the table top cover snagged on the side of the the shelves.
Had I not caught it in time, the top might have shifted enough to dump whatever was on it onto the floor. Not good. Now I make it a point to lower the table completely when I store it, or at least check to make sure it won’t snag on anything while it drifts downward.
I’m not sure why the table started leaking. I don’t think it had that problem for the first few months. I suspect that it may have been caused by storing the table standing on end to save space.
I did that for a period of a few months, and it was around that time that I started noticing the downward drift problem.
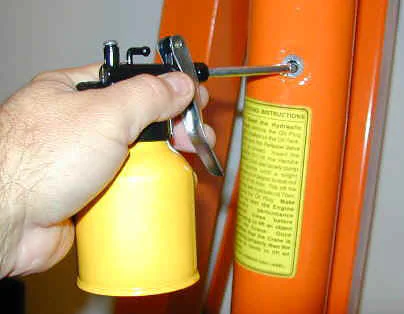
I tried adding hydraulic fluid, but that did not solve the problem - in fact, it created a new problem: leaking hydraulic fluid.
I followed the instructions in the user manual for adding the fluid, but for a few weeks after I topped it off, I would find a small pool of hydraulic fluid on the shop floor after the table sat there overnight.
Over a few months time, the leakage diminished and now leaves just an occasional few drops on the floor, but the table still drifts downward. Some info I found on the web suggested that it might be a ball valve not seating properly.
Someday I’ll tear down the valve mechanism and see if I can find and fix the problem. If you decide to buy one for yourself, it might be a good idea to get the optional extended warranty in case you have a similar leak.
Update 10-27-13
In the last year or so, I partially disassembled the hydraulic cylinder in an attempt to find and fix the cause of the leak. Internet research suggested that it might be fluid leaking past the check valve ball.
Did not have any real success with this route, but may try again another day.
Table Height Stops
Meanwhile, I got really tired of the table drifting downward. Not surprisingly, the heavier the load, the faster it sinks. I made two positive stops to hold the bearing wheel at a fixed point in the track.
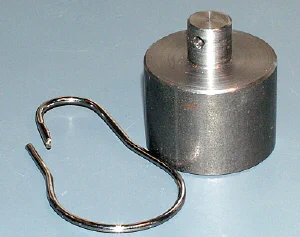
The first stop was made on a metal lathe from 1-1/2" diameter 12L14 free-machining steel. Pretty much any steel alloy would be fine. I don’t know how much force is involved, but I decided to stay away from aluminum for this job.
The stop is quick and easy to make. The narrow end is inserted through a 1/2" dia. hole drilled in the side of the HT frame and is then secured in place by a safety hitch, that prevents the stop from accidentally being knocked out of place.
The hitch pin I use actually is a spare shower curtain ring. It bears almost no force, so it can be just about anything that will keep the stop from being knocked out of place.
The hole for the hitch pin should be placed close to the outside wall of the frame so that the hitch pin holds the stop close against the inside wall of the frame for maxium strength.

The stop above works great, but only when the table is in the fully raised position. I thought about drilling a series of holes to position the table at various heights, but did not want to risk weakening the frame with more holes.
One or two more probably would not be a big issue, though.
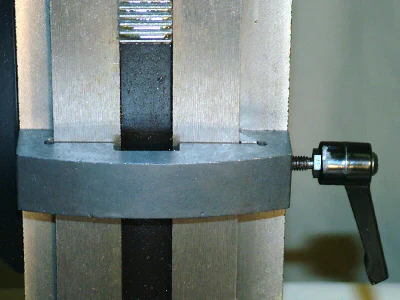
The second stop can be positioned anywhere along the track, thus locking the table at any desired height. While more versatile than the fixed stop, it is not nearly as secure, so I don’t feel safe using it to support loads of more than about 200 lbs.
and for periods of time of no more than an hour or two. In retrospect, a piece of 2x3 cut to fit, and clamped in the track with a large C-clamp, probably would work just as well.
I think that’s where I started before I made this “improved” clamp.
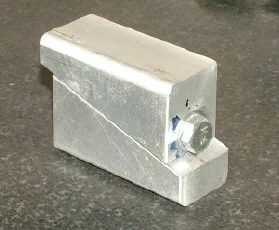
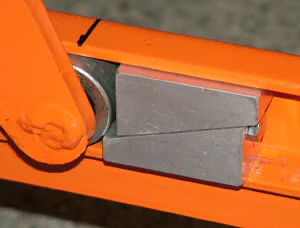
The bolt hole in the lower wedge (in the left photo) is threaded. The hole in the upper wedge is oversize diameter to provide room for wedge to move. As the bolt is tightened, the height of the wedge increases until it locks up tightly in the HT track.
The corners are rounded so that the wedge fits as closely as possible into the side of the track. Unfortunately, accessing the bolt to tighten or loosen it is inconvenient.
Conclusion
I bought the hydraulic cart with one purpose in mind: moving heavy machines; but it has proven so useful that I use it nearly every day.
The main disadvantage is that it takes up space, so you need a place where you can store it, or at least keep it out of the way when its not in use.
While certainly not essential, I find that the removable top that I made adds versatility and provides a better working surface than the steel table or the stock rubber mat.
On mine, at least, there’s some play in the push handle: the top of the handle moves forward about 3 inches, so I have to be careful when handling tall heavy loads not to get my fingers pinched, but this has rarely been a problem.
So, aside from the leakage problem, I’m very satisfied with the table. I use it so often now, that my shop procedures would be noticeably less efficient without it.
A few years before I purchased the table, I bought a folding 1-ton hydraulic crane.
While the crane is useful for many lifting jobs, it’s not nearly as versatile as the table and sits unused for months at a time between jobs.
The table, by contrast, gets used nearly every day. The list price currently (01/12) is about $350, but it’s on sale as I write this for about $250.
Keep in mind though, that you still need a way to get a heavy load off of the floor or pallet onto the hydraulic table, so the table doesn’t completely replace the crane.
An inexpensive hydraulic auto jack, plus a stack of short lengths of 2x4s and 4x4’s may be all you need to get a heavy tool up onto the table.
That’s how I used to lift machines onto furniture dollys before I got the hoist and the cart.