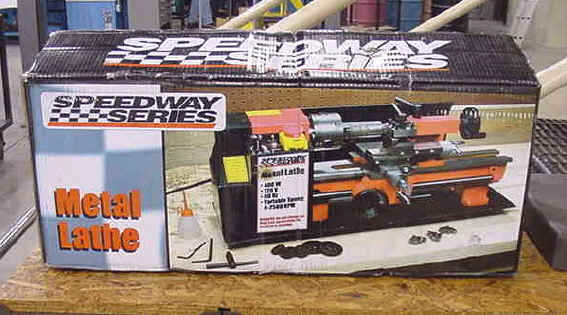
Homier (Speedway) 7×12 Versions
Homier is another discount tool distributor that offers a version of the mini-lathe. They run travelling tent shows at which you can see and buy the tools, or you can order from their web site. The picture below, from their web site, shows a red model, but the ones currently being shipped are blue (see pix below).

Specs from Homier web page:
- 400W
- 120V
- 60HZ
- Variable speed 0-2500 RPM
- 5 hex wrenches
- Light oil bottle
- 3 external jaws
- 1 chuck key
- 1 center roller
- Chuck diameter: 3.15″
- Top slide travel: 1.38″
- Cross slide travel: 2.56″
- Spindle accuracy: .0004″
- Distance between centers: 12″
- Swing over bed: 7″
- Shipping Weight: 79 lbs
- homier.com Item: 03911
Quite a few members of the 7×10 group have now purchased this lathe and the reports have all been very favorable. Quality seems at least as good as the Grizzly and HF in most respects and everyone who has bought one seems to be quite pleased with it.
As with all of these tools, regardless of vendor, the packaging is not quite adequate for the weight of the machine and they often arrive with minor damage. A few owners have reported that the tailstock was flailing around in the box during shipping. Shipping charges are now about $55-60.
Rising demand for these lathes has apparently made it difficult for Homier to keep them in stock. Availabilty via their web site has been sporadic – a few arrive and are quickly sold, so you will have to watch the stock status and order quickly when they have them.
A recent report from a new owner states that the spindle plate now has the extra holes for the 4-jaw chuck. If this is a permanent upgrade, and not just a one-time fluke, it will make this lathe an even better deal.
There has been some discussion on the 7x group about the Homier speed control. The premise is that unlike those on the Grizzly, MicroMark and Harbor Freight models, which use Pulse Width Modulation (PWM) and MOSFETS, the Homier uses SCRs. Generally, power supplies based on SCRs do not provide as much torque at low speed as PWM supplies.
The jury is still out, as I have not seen any definitive measure of low-speed torque on the Homier compared to the other lathes, but as the picture below indicates, this is a fairly complex circuit and may be as good as or better than the other designs. Time will tell.

Here’s some information posted by Gregg Eshelman :
The Homier includes only the 3 jaw chuck, tailstock dead center, 14-17mm combination open end wrench and metric hex wrenches for every cap screw on the whole lathe. It also includes a chuck key, of course! That’s all you get for “extras”. You have to supply your own 10mm wrench to remove the chuck from the spindle.
The Homier uses four bolts to attach the headstock to the bed VS three on all the others. Homier has a double ball bearing on the carriage handle VS a plain hole on the others. Homier has heat treated and ground topside of the bed.
And now it also comes with the six hole pattern in the spindle face for mounting 3 or 4 jaw chucks. (That’s a recent change, My Homier only has three holes. Has the versions web page been updated on this?) [Yes, FJH]
About the only “catch” to the Homier is it uses an SCR type controller instead of a PWM controller. The SCR type produces slightly less torque at lower speeds and makes the motor hum louder. But some of the other brands’ PWM controllers seem to be more “delicate”.
Plenty of people have fried their controllers when accidentially stalling the lathe, sometimes they’ve blown just doing easy stuff like turning aluminum. So far on this list I’ve not read about anyone frying the controller on a Homier.
I’m happy with my Homier and have done a few mods to make it even better. I’ll have to drill 3 more holes in the spindle face when my 4 jaw chuck arrives from HF.
One notable difference is that the spindle apparently has only 3 mounting holes, precluding direct mounting of a 4-jaw chuck. (This deficiency may be corrected on newer models) Presumably, this can be solved by drilling the extra holes (see comments below on how to do this.)
Also, Johnny Eaton reports that the lathe uses 3/8″ tooling, rather than the 5/16″ tooling used by most of the other mini-lathes.
Johnny Eaton, recently purchased one and was kind enough to send me some pictures (see below). It is indeed a 7×12, and at $299 plus about $40 ($58 now) shipping (varies by destination) it may be the best bargain going.
It does not include the faceplate and steady rest that come with the Grizzly 7×12, but you can get these from Harbor Freight and still come out money ahead. See my Accessories page for more info.
However, while these accessories are known to be interchangeable among most of the 7x lathes, the Homier is made by a different factory and there are a few exceptions as noted below. The following information was provided by Galen Evans:
I ordered a follow rest (43580), steady rest (43579) and face plate (43582) from HF. They just arrived and I tried them on my Homier:
Steady Rest: Seems to fit perfect. I haven’t used it yet, but it mounts to the ways and matches centers with the tail stock center.
Follow Rest: Overall dimensions seem a bit wide – it rubs on the cross slide enough to prevent the back bolt from threading easy.
Worse, the front FR bolthole misses the front hole tapped into the carriage by an inch or more. I will drill & tap carriage when I get “a round tuit.” I may have to slot one hole or take a cut on the right side of the follow rest to provide clearance for the cross slide.
Conclusion: does not fit; Can be adapted. Face Plate: Back of face plate dimensions match back of OEM 3-jaw chuck dimensions within the measurement accuracy of my digital caliper.
So, it should fit perfectly. I have not mounted the face plate yet because there is work mounted in the 4-jaw and I don’t want to disturb the setup until finished. No mounting studs or bolts were included with the face plate.
The Homier seems to have a forward-reverse interlock built-in: My unit will not start until the variable speed control knob has been clicked into OFF position and then turned back up to speed.
If I flip either the foward-reverse or master power switch the lathe is simply dead until I also turn the speed control to zero and then back up to speed. [Note: all of the newer 7x lathes have this feature FH]
Here are Johnny Eaton’s comments and pictures:
I did go look at it (the one on display was blue not red) but they assure me they were the same. The control layout is the same as the grizzly. The name on the front is Speedway. The fit and finish looked better than the one in the harbor freight store.
The length from the base of the headstock to the end of the bed was 19~1/2″ It was going to be 299.99 + 18.00 tax = 317.99 off the truck (on Homier’s website I can purchase it for 299.99 + 33.49 S&H = 333.48).
I guess I should have bought one yesterday, but I was a little unsure. I will probably order one within a week or two. I will update you when I find out more.

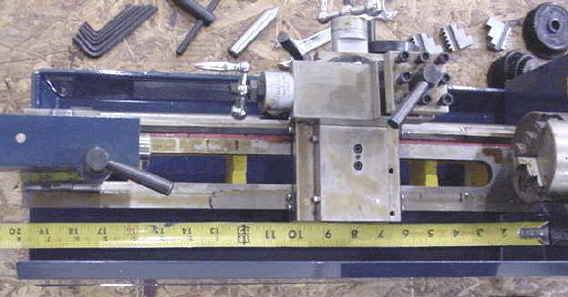
Here’s another photo by John Grounds:

There was some question on the 7×10 group about what was included with the Homier version. Here’s a comment from Gerald in Iowa:
I recieved a big cardboard box with two pieces of styrofoam holding a blue lathe. Inside the box was a bag of stuff. Including a couple of metric allen wrenchs, a open ended wrench for the tailstock, a set of outside gripping jaws for the three jaw chuck that was mounted to the lathe, a cute little oil bottle, a dead center (what the hell is a “centering roller”???), a chuck key for the chuck, and a ten piece set of plastic gears( The box says 6 ???), and an instruction manual.
The lathe on the box is red and the one inside was a nice shade of blue. All this for the grand total of $299.00. I guess it is a good thing I had a couple of extra mt2 drill chucks sitting around cause I had to cut most of the taper away so I could get max drill length.
[Note: this is true of all versions of the minilathe – FH]
I found the following message on another board. The message suggests that info on how to set up the threading gears may not be marked on the lathe or provided in the manual. Presumably the set up is the same as on the other 7x machines.
Purchased a mini lathe from Homier, similar to the one offered by Harbor Freight and other companies. Never used a lathe before so this is going to be a learning experience. My question concerns the gear set used for threading. I’ve figured which are the “B” “C” and “D” gears and how to change them.
What I think is the “A” gear is metal and not plastic and sems to be tightl afixecto the shadt and also appears to have a sleeve that goes through a mounting plate and has another plastic gar on the back that is held on by a snap ring. Could someone please let me know what gears are what, a or drawing with the gears labeled would be great.
Update (12/09/01) – Observations from Ralph Pattersonus:
This is interesting! I saved your photo of the Homier Blue Lathe and then used a photo editor to lighten it a little. Looking at the details I began to see some interesting differences between it and the HF 7×10 that I have:
- The aft side of the carraige is fitted with bed wipers, probably some on the front side as well.
- The TS clamp bolt is topped off with a shiny acorn nut.
- The backside of the TS appears to have two setscrews to secure the top to the base.
- The lead screw extends more than a diameter through the back of the bearing block.
- The LS BB is fitted with an oiler with ball, not just an open hole.
- The thread dial is secured with a screw.
- The tool holder block appears to have dog-pointed tool clamping screws (one of the first mods to my machine was to chuck up all of the screws and turn the threads off about .10″ of the end and file a radius on the tip).
- The shape of the handles on the CS and Compound is different than the HF.
Here are some comments from Ejay Hire:
My new lathe arrived Via Ups Yesterday. (Yes, It shipped UPS Ground. The Ups invoice says 90 lbs.) I’ve cleaned off the packing grease and overall I’m happy with it. Features:3 Jaw Chuck w/ inside and outside jaws 4-way indexable Toolpost (Didn’t measure to see what tye of tooling it took) Tumbler Reverse and Electronic Reverse.
(lever on the Back for Tumbler reverse) Electronic Speed control and Mechanical Hi/lo speed (0-1100 Low, 0-2200 Hi) Assortment of change gears for threading _Hardened (Heat treated) ways_ (or so it says… I didn’t take a file to it.. but I believe it..)
Real fiddleable Gibs on all of the dovetails. (even the Half-nuts have an adjustable gib). The Apron can be unbolted to make adjusting the Carriage Gibs Easier. A threading indicator that can be pulled out of the way to keep from wearing it out.
12.25 inches between the Face of the Chuck and the Point of a Dead Center in the Tailistock at the end of the ways. ~15 inches between the Face of the spindle and the Point of a Dead Center in the Tailistock with the tailstock slid out as far as is safe.
A Rack and Pinion on the Apron for manually moving the Carriage. (The leadscrew is only used for automatic feed) The Leadscrew has a Thrust bearing on the Pillow Block.
The only thing that bothers me about it is the Tailstock. It’s lock-down bolt came loose during shipping and the it got beat around pretty badly. I believe the book when it says that the ways are hardened because the tailstock bounced around on them long enough to wear about 20% of the Paint off of the Tailstock, but there isn’t a scratch on the ways.
I don’t like it that the adjustment (side to side for Tapers) uses a single bolt that is on the bottom of the TS casting. Additionally, the TS is the only part with a no adjustable gib on the dovetail. I still think this machine is a good value even if the tailstock wasn’t in the box at all.
For those who couldn’t find the chart that said what Gear combo to use for whic type of threads, mine is on a Heavy-duty sticker on the plastic cover over the gears.
It took me about an hour and a half to get all of the gibs adjusted nice and not-too-tight. It was the first time I’d done it, so a pro could’ve done it it 30 minutes. Ask me on monday and I will post a howto on adjusting the Gibs..
I used Wd-40 to clean off the packing grease. Then I put Lithium Grease on the Ways, gears, Gibs, Inside the Chuck (on the scroll Gears and on the scroll), Leadscrews… I also ran taps into Most of the Threaded Holes.
I found some Packing grease, but all of the holes had well formed threads and I didn’t actually cut any threads at all. All of the Screws were tight (except the TS hold-down) but disassembled easily enough. This means they aren’t assembled by an 800 lb gorilla with an impact wrench!
I also had Plastic Way-wipers to keep Chips away from the Compound. They are too small (i.e. won’t reach the ways..) , and I will probably use them as Clamps to hold oiled felt Pads to use as way-wipers. I haven’t seen this on any other machines.
This machine is definitely worth $299. I think It’s even worth the $475 that grizzly Charges for it. I haven’t run it under power yet, and won’t be able to until at least monday. (Preparing for CCIE Lab Exam Friday in San Jose). I’m looking forward to making Chips with it, and possibly a part or two..
P.s. I think I might have been jipped. I haven’t found the sand in mine yet. I think they might have forgotten to include it. 🙂
P.s.s. It’s Blue, I’m pretty sure most of the Homiere ones are blue, but the one on the box is red, and the one in the manual is White.
Comments from P. Wasinger:
Ordered a Homier 7×12 Mini-lathe from their website this weekend and UPS delivered it this afternoon. Box looked OK on the outside. After unpacking though I found the lathe inside to be pretty banged up.
Chip tray totaled, tailstock handwheel busted off & shaft bent, crossfeed handle and dial busted off and completely missing, plastic gear end cover cracked, saddle loose as a goose on the ways.
Immediately called Homier service line. After a 5 min wait I spoke to one of their service agents who took down my information. She was courteous and said this would be a UPS shipping claim issue because of the amount of damage. Now I’m waiting to hear from UPS. Other than that the unit looks fine.
Dark blue color all over. Good paint finish (except for the damaged areas). Plugged it in, hit the switch and it seems to run OK. Sounds a lot smoother than my red HF 7×10 and the speed control goes down to almost zero.
Now lets see how I fare with getting the damaged items fixed. Will keep the group posted. My advise to those who are about to receive a Homier 7×12 is the cardboard shipping box and styrofoam packing is totally inadequate for the weight and shape of this lathe (my HF 7×10 came in a wood box without a scratch) So thoroughly inspect the delivery before accepting from UPS if you can.
Here are some comments from Paul Chamberlain on drilling the extra spindle holes for a 4-jaw chuck:
The additional holes do not need to be very precise. The chuck is located in position by the circular step on the face of the spindle, engaging the recess in the chuck’s back. The studs, nuts and holes only hold the chuck against the face of the spindle.
If you’re reasonably accurate with a hand drill, you could use a piece of brass or aluminum as a backing, so you don’t over drill into the headstock.
A set of transfer screws would be a handy tool to add to your inventory. They are used to locate the position of a threaded hole, leaving a center punch like mark. They look like a set screw with a pointed tip, facing outward from the threaded hole.
With transfer screws in three holes, and a stud in the fourth, you place the chuck against the face of the spindle and give it a tap with a mallet. You will then have center punch marks exactly where you need to drill. The transfer screws can be purchased, or made on the lathe.
